
Contact Us Toll-Free At - 800-523-8197
Wishlist


Measuring Guidelines
Guidelines
TRY IT ON! The most accurate way to ensure proper fit is to TRY ON a fit sample of the actual garment to be worn. It’s even better if fit samples are pre-washed to reduce stiffness and allow for slight shrinkage (especially with 100% cotton garments.)
Tip: When using fit samples, use a sample of the garment that will actually be worn. If you switch styles or suppliers, you need to re-fit with pre-washed samples of the new garment. Garments are cut differently depending on the style. A medium in one style may be too small in another!
Measuring: Taking correct measurements is the best thing. Don’t let anyone measure themselves. It’s too easy to make a mistake, especially when measuring hard to reach places.
Tips:
- DO try to have the individual wear the actual shoes to be worn with the uniform. The style and type of shoe worn with a uniform will affect the pant length. Please keep this in mind when measuring.
- DO NOT adjust the measurement to allow for shrinkage. Potential shrinkage has already been figured into sizing the garment.
- DO order the larger size if measurements fall between two sizes (unless the individual being measured prefers their uniforms to fit a little tighter).
Don’t second guess the sizes shown in the reference guide. Sizes on the size/conversion charts in this guide are based on actual body measurements in inches. Garments are designed to be fully cut, allowing for ease of movement and comfort.
Never simply ask an individual what size they wear. Uniform sizes do not necessarily relate to retail sizes and most people will state their best retail size when asked (or they may guess at it, or tell what they’d like it to be).
Waist measurements! Don’t let them “suck it in” to cheat the actual measurement. If they do, they’ll pay for it later with a fit that’s probably too snug. Just have them stand up straight and relaxed.
When ordering, be sure to give all sizes requested. For example, some shirts require a neck and sleeve length.
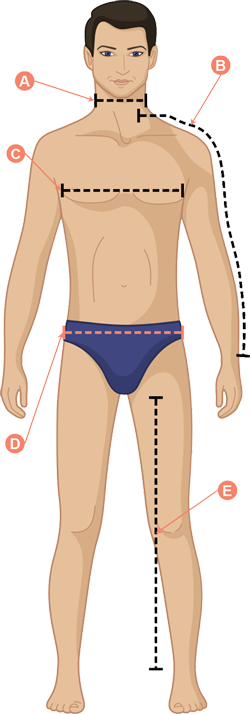
Sizing Instructions for Men
-
Neck Size
Standing at his side, hold the tape snugly around his neck. The number of inches shown is his neck size.
-
Sleeve Length
Standing at his back, have him hold up one arm chest high and touch his nose. Measure from the bottom center back of neck (the round bone at the top of his spine), down the arm across the elbow to the far end of the wrist bone. The number of inches shown is his sleeve length.
-
Chest Size
Standing in front, measure around the fullest part of chest, under the arms and around the shoulder blades. The number of inches shown is his chest size.
-
Waist Size
Standing in front, measure around his natural waistline, just above the hipbones. The number of inches shown is his waist size.
-
Inseam
You stand in front. Have him stand with both feet flat on the ground with legs straight and slightly apart. Have him hold one end of the tape measure at the base of his crotch seam. You straighten to tape down the inside of his leg to the top of his shoe. The number of inches shown is his inseam length. Remember–this measurement will be more accurate if he is wearing the actual shoes to be worn with the uniform.
Sizing Instructions for Women
-
Bust
Standing to her side and holding tape firmly under one arm, measure around the shoulder blades, under arms and around the fullest part of her bust. She should keep her arms to her sides as much as possible – it will affect the measurement if they are raised too high. The number of inches shown is her bust size.
-
Waist
Standing to her side, measure around her natural waistline. The number of inches shown is her waist size.
-
Seat (Hips)
Standing to her side, measure around the fullest part of her hips. Start 7 to 8 inches below the natural waistline. If the tape can’t be moved up or down, it’s not around the fullest part. The number of inches shown is her seat (or hip) measurement.
-
Inseam
You stand in front. Have her stand with both feet flat on the ground with legs straight and slightly apart. Have her hold one end of the tape measure at the base of her crotch seam. You straighten the tape down the inside of her leg to the top of her shoe. The number of inches shown is her inseam length. Remember–this measurement will be more accurate if she is wearing the actual shoes to be worn with the uniform.
